Producing Gesneriad Seed
This paper was written by Laura Johnson and originally posted on the author’s web site. She is no longer maintaining the site and has graciously allowed The Gesneriad Society to reproduce the material here.
Pollination
Producing seed with gesneriads isn’t difficult. At the most basic level, it simply involves transferring pollen from the anthers to the stigma. This article deals with self-pollinating a hybrid or species, to produce seed of its self.
The female parts of a flower are collectively referred to as the pistil. The pistil is broken down into three parts: ovary, style and stigma. The stigma is the part at the very end of the pistil. This is the part to watch, for that is where the pollen needs to go for seed to form.
The male parts are grouped as the stamen. The stamen consists of the filaments, with the pollen-bearing anthers at the end.
Timing is important, for the stigma usually isn’t ready to accept pollen until a blossom has been open for a couple of days. This varies from species to species, however. Close observation is your best bet to judging when a stigma is receptive to pollen. After some practice, you’ll be able to judge quite easily.
Don’t be afraid to cut open a few flowers to get a closer look at what’s happening inside. You can very carefully slit a blossom open without damaging the reproductive parts, then watch over the course of a few days as the changes occur.
Sinningia ‘Orange Zinger’ is used as an example. The photo shows three blossoms, each at a different stage of development. Note how the appearance of the stigma and anthers change over just a few days.
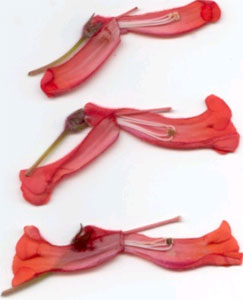 |
| The top blossom has barely begun to open.The pistil is the short straight object sticking out at the top. The stamen is the group of long white filaments in the center. The anthers, which produce pollen, are at the end of the filaments. |
| The middle blossom has been open for a day or two. The pistil has lengthened, and the stigma at its end has begun to swell. Also note that the anthers have turned brownish, and the filaments have started to shrink. |
| The bottom blossom has been open for three or four days. The stigma is pretty much ready to accept pollen at this point. The anthers have shed most of their pollen, and are considerably smaller than just a day or two ago. |
There is much variability among species as to what the reproductive parts look like at the various stages. Among miniature Sinningias, some seem to have very long, obvious pistils, and the stigma is very noticeable when it is ready for pollen. Other mini Sinningias seem to be more subtle — the pistil stays smaller and shorter, and needs to be watched closely. In some other gesneriads, the pistil doesn’t grow much at all, and the stigma only enlarges a little bit.
Now that you know how to identify a receptive stigma, it’s time to apply some pollen. There are many ways to get the pollen onto the stigma. I use very fine, soft paintbrushes to dab the powdery pollen onto the stigma. Some people use flat wooden toothpicks to “scoop” the pollen and gently dab it onto the stigma. In any case, all you need to do is get some pollen onto the stigma. If there’s no pollen left in the blossom, you can move pollen from one flower to another from the same plant.
It is important to use a fresh toothpick for each plant, or to dip paintbrushes in rubbing alcohol between plants and allow the brush to air dry. These steps prevent accidental cross-pollination, which would produce hybrids rather than selfings.
After Pollination
Proper cultural conditions play a part in successful seed production. Be sure temperature and humidity are in the proper range for the plant you’re working with. If your pollination attempt was successful, usually the blossom will drop off within a day or two. This is because the fertilized ovary has started to swell, and pushes the blossom off.
Some hybrids are sterile and simply will not produce seed.
Seed maturity time varies with the species. Most Sinningia capsules are just starting to dry and are ready for harvest in 30 days. Streptocarpus take about 2-3 months. African violets take many months. I’m not too familiar with ripening times of other genera.
Harvesting Your Seed
Learning to recognize the signs of a mature capsule also takes observation. Normally the capsule starts to turn a brownish color, and if you look closely you can see the line where it’s going to split open. I find that I don’t get much warning. It seems like one day a capsule is green, then the next it’s already dried and split open with the seed scattered all over! If you keep a close eye, you can cut the capsule off just as it starts to split open, but before losing any of the seed.
If you like, use a magnifying glass to inspect your newly harvested seed. A 7x lens is fine. You should see plump little brown seeds, but the exact color and size varies among species. Again, observation is key to learning how to identify viable seed from chaff.
This material is meant to be a general guide. There is a lot of variability within the gesneriad family. To really become successful at seed production, you have to watch and observe your own plants and be willing to learn from them.
Copyright 1999
L. Johnson